Monday, October 30th, 2017
Death of a Water Heater – Not as Sad as You Think

a.k.a. “How to Jump-Start an Overdue Basement Makeover”
Note: Janet Murphy is the monthly blog writer for Allied Reddi Rooter. After years of writing about water heater replacements, she finally has one of her own. Below is her blog-a-monial.
Sunday, October 8, 2017
11:47 am
• Notice water leaking from under the water heater tank.
• Verify the pilot light is still lit (it is.
• Clear a path on the basement floor, so the water leaks into the basement floor drain.
12:22 pm
• Google “cost of new water heater”
• Identify worse-case scenarios:
• The tank can “let go” and dump 40 gallons of water onto the basement floor. Uggggh.
• The pilot light can go out, creating a gas leak.
• Call a family meeting to show the kids how to locate/use the gas line shutoff valve (in case the leak causes the pilot light goes out).
1:30 pm – 11:00 pm
• Recheck leak – still leaking.
• Identify best-case scenarios:
• We get a plumber first thing Monday morning.
• Our 20+ year old water heater will be replaced.
• This is the beginning of basement makeover.
———
Monday, Oct 9
8:30 am
Called Allied Reddi-Rooter. In accordance with their policy, they scheduled an appointment for arrival between 9:00 am – 11:00 am.
9:20 am
Jason from ARR arrived, made an assessment and suggested a like-for-like water heater replacement, for about $1,000 – about what we anticipated, cost-wise.
9:30 am
Discuss alternatives/consult further with Jason. When our water heater failed, it created two home improvement opportunities:
1. Our old water heater was venting through an old chimney. Over the years, the moisture from the water heater vent caused flu collapse and crystallization in the chimney brickwork. Over time, the crystallization
began leaking into the interior walls, under the paint, causing blistering. To address the issue, we chose to install a ‘power vent’ water heater, that vents directly outside, through a hole in the foundation wall.
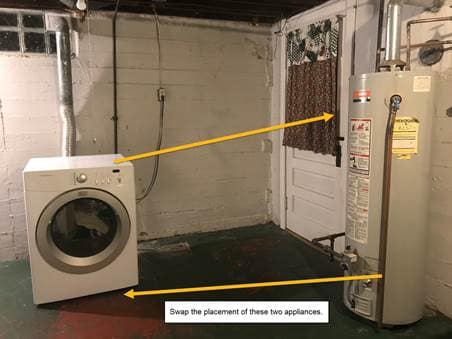
2. By choosing a power vent model of water heater, we needed to change the water heater location, which allowed us to re-configure our washer dryer setup. Goal: Swap the placement of the dryer and the water heater, which will get the washer and dryer side-by-side.
3. After conferring with Jason, we landed on the plan illustrated in the picture below.
10:00 am
Jason provides detailed estimate, including the 10% off coupon from the website. The cost of our project doubled – which we were prepared to hear — but it provided a much-needed jump start to an overdue “old house basement” makeover.
10:05 am
We agreed to the estimate, Jason ordered the new water heater and materials and left with a promise to begin work early the next day.
Tuesday, Oct 10, 2017
8:15 am
Jason returning to complete the job (an all-day affair – this was a big job).
5:15 pm
Jason completed the installation, tested the new water heater, cemented the new power vent into the foundation wall quite nicely, and cleaned up his work area.
At the end of the job, the invoice matched the estimate, including the 10% discount from the Web. Jason did what he said he would do, and he did it professionally. We could not be happier with the results. Are you read to to start your own project? Give the team at Allied Reddi-Rooter a call or Contact us. We always come highly recommended and have earned an A+ rating from the Better Business Bureau for our expert quality of service.