Monday, June 13th, 2016
Cincinnati Plumbers DIY Tip: Cleaning a Faucet Aerator
In our mid-century-modern kitchen, we have a single-lever faucet that’s at least 15 years old. It’s nothing special; it’s a little leaky if I move the lever a certain way but it gets the j-o-b done. What really bothers me is that water shoots out the tap in a ‘split stream’ instead of a nicely aerated gush. Do I need a new faucet? Nope, I just need to spend about 15 minutes cleaning the hard water (a.k.a. calcium) deposits out of the aerator. Here’s how:
Supplies
• A dishtowel
• A crescent wrench (I grabbed one from the toolbox in the basement)
• An old toothbrush
• A dry paper towel (upon which to place the aerator parts)
• Your favorite de-liming solution (e.g., vinegar, Lime-Away, CLR, etc.)
Warning: Aerators are made of soft metal or plastic – use a wrench with great care to avoid marring or breaking the aerator.
Getting Started
1. Lay a dishtowel flat over the sink drain (in case parts are dropped during the process).
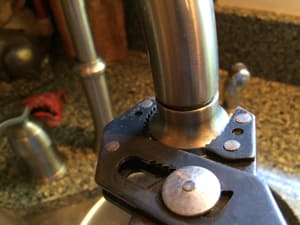
2. Remove the aerator from the faucet. Sometimes, aerators twist off easily by hand. Others require a crescent wrench to loosen. When the aerator is loosened, put down the wrench and remove the aerator by hand, taking care not to drop any parts down the drain.
Note: Take a close look at your aerator before laying on the wrench– some aerators have built-in “wrench notches” that aid in proper positioning of the wrench.
Tip: Place a soft cotton cloth between the wrench and the aerator to avoid damaging the aerator.
Cleaning the Aerator
3. Place the aerator onto the paper towel and carefully separate the parts (note the order of placement of the parts, so you can put it back together again). In the “Before” image below, the gunky buildup and calcium deposits (white flecks on the red cartridge) are clear. Note: some aerators include an o-ring; if yours has one, clean the o-ring along with other parts.
4. Using an old toothbrush (or other soft brush) and your de-liming solution of choice (a vinegar soak, CLR bathroom cleaner, Lime-Away, or similar water-deposit remover), gently clean the aerator parts. You can see the difference cleaning makes in the “After” image.
Re-Assembly
Once the cleaning is complete, re-assemble the aerator and re-attach it to your faucet. Tip: Apply a light coating of vegetable oil to the aerator threads to aid in re-assembly. Hand tighten until snug; tighten a bit further with the wrench if needed.
Water You Waiting For? Cleaning a faucet aerator is an easy DIY task that costs nearly nothing and does wonders for kitchen and bathroom morale. For more complicated plumbing needs, the professionals at Allied Reddi-Rooter offer prompt, professional and courteous service – in most cases within 2 hours of our call. Use our coupons and receive 10% off the labor charge for any plumbing repair. Call, or Contact us today: 513-396-5300. We always come highly recommended and have earned an A+ rating from the Better Business Bureau for our expert quality of service.